Showing posts with label interior design. Show all posts

Monday, February 6, 2012

Living Room: Gallery Wall

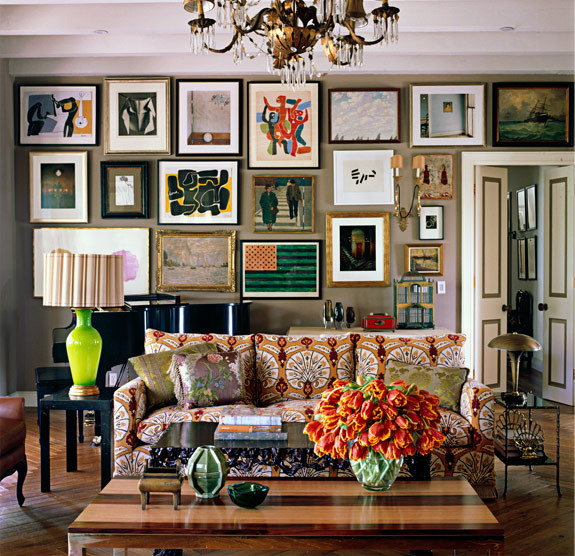
WAY back in the day, I decided I wanted to do a gallery wall in my living room, but I never actually did it. {Confession: I am a procrastinator on some things}  However, part of designing my renovated life is bringing great ideas to fruition. I think the area just left of my front door is the perfect spot for a gallery. I decided to scout the world wide web to see what I could see.  Look what I saw!

{Source

I especially love the ampersand, the oversized letter and the all black frames. I want to focus my collection using pieces of art, framed family photos and text. This might be a bit of a process because I am a bit picky but I am excited about this. 

Do you have a gallery wall? If so, share the link, I'd love to see it.

If you don't, what do you think about this? Seriously, I wanna know!  xoxo tami

Monday, January 23, 2012

2012 Home Goals Party


I was browsing through some of my favorite home decor and home DIY blogs and came across a super fun party! The 2012 Home Goals Party is a wonderful links party on The Nester .  What I love the most about participating in this is that I not only get to know other amazing ladies who are loving their families and homes but I also have a place to be accountable for the things I plan to accomplish this year.


We are on month 3 of our 13 month lease.  I have some very specific things I want to accomplish before I move into a larger place, so I have actually been thinking that I may stay on for another 13 months. After all this place is pretty cheap for Los Angeles and it's ALL utilities included. {SCORE} By staying on, it will put us right in line to move into a much larger spot and settle in just in time for Christmas 2013. However, while we are in transition in this little place, I plan to make it the best little apartment I can.


As I read the questions The Nester asked herself, I really reflected on my own home and why I started this blog when I moved in here AND why I called it My Renovated Life. Her questions were:
  • What's my favorite room in my house? Why?
  • How and where does my family hang out together? What's working for that room? What's annoying in that room?
  • Is there something in my home I want to do but I'm afraid? What if I take that risk? What's the worse that can happen?
  • What's the purpose of my home? Is that obvious by how we use it and what is filling it?
  • Do the objects in my home reflect our family or do I just have things because someone told me it looked good, gave it to me or bought it for me?
  • Am I neglecting my home and not putting money into something that is needed? Am I squandering money on something I don't need or enjoy?
Oh boy, did that get me to thinking. After careful reflection, I decided on 6 specific goals that I want to accomplish:
  • I plan to sew up my own curtains for the living room and bedroom. Not only will they warm up our rooms and add a little personality, but I also want an additional level of privacy from the people who live in the building next door. Seriously, they can look out their windows into my apartment. We are all of 15 feet away from one another, if that.

{See what I mean. Mind you this is a full on sunshiney day! Yep... welcome to my world}
  • I want to make an "inspired by Anthropologie" duvet cover and bed skirt, purchase a few new sheet sets and DIY an upholstered and tufted headboard for my bed. My mattress and box spring literally sit on the floor. I am actually okay with this. But I need a way to make it look more like an actual bed / faux platform and it will make a great focal point in the center of my window. As for the bedding, well, I no longer own an matching sheet set. That has to change this year. Nothing matches AT ALL. We have a variety of pillows in all shapes and sizes, rubber duck sheets with various pillow cases, a red comforter and a pink Betty Boop throw blanket. Um, yeah, how do you like that visual. Ah, well, it still does the job even if it isn't much to look at. {LOL}
 
{Oh you wanna know about the stuffed animals? Don't judge me! No seriously, my babygirl sleeps with me. But she knows it's time to move them off the bed. She is entering middle school next year.}
  • I need to purchase an assortment of lighting options for my dark living room. When I say it's dark, I mean it is dark. Not an hour of the day goes by when we do not have the ceiling fan light on. It's annoying and doesn't cast the most attractive light. So, yeah. I have got to do something about that. 
  • Once upon a time I rented a cute little studio in the perfect spot in Pasadena, just 3 blocks south of Colorado {the street the Rose Bowl parade comes down}. Alas, along with the recession and my decision to significantly scale back, those days are over for the moment. Therefore, I work out of my apartment along with our assistant, Cara. I have already begun the decor project for my workspace {which is in my dark living room, no less} however, Cara has no where to work. No desk whatsoever. We seriously have the best assistant on the planet. She is so excited to work every day she comes in and is sweet as pie. She literally plops down on the sofa and makes it happen with a smile. We are also fortunate in that there are a barrage of coffee shops within walking distance to my place, so we take advantage of that as well. My workspace needs to be completed and Cara needs a place to grind it out. Further, this space can double as a place for my girls to do their homework without distraction and without giving them free reign to disorganize my desk. I feel like a bad boss and bad mom. They are all such good sports. Love them.
 
{There is actually sunshine in the bedroom since my apartment is in the rear of the building. I love that there is a window in my closet. First time I ever had that! Do you see those sliding doors at the top for storage? They are actually painted in that position thanks to the people who painted the place before I moved in. I REALLY want to take a sledge hammer to it and risk losing my deposit. Not sure how to un-stick them. Still thinking about that one.}
  • I plan to revamp my closet and buy a dresser. As it stands we have absolutely NO dressers or chests of drawers or armoires. Our clothes are either on hangers or residing in baskets and plastic bins. That has to change. My girls and I have a LOT of shoes. Seriously, it's ridiculous, but we love shoes. I really need a creative way to organize our shoes and free up the closet space a bit. And just look at those baskets. Enough said, okay?
 
  • I will install art and photos on my currently bare walls. We need personalization up in here, up in here. It just needs to happen. Point blank period.

  • Lastly, I need to bring more laughter and good times into my home. As a family, we have plenty of good times. But I have been notoriously bad about entertaining friends in my home. I would love to buy an iPod sound system, plan a fun menu, buy some wine and alcky-hawl and have the girls over for a little laughter and silliness. I'd love to host a Grammy party or a Golden Globes party. Perhaps a spa and pamper soiree. I need floor pillows, an area rug, some great dishes for entertaining and a bit more ambience. It's time to infuse more memories into this place.
I also need to do something to both my kitchen and bathroom, but I think that I have enough on my plate without adding stress. If I finish these goals by August, I will gladly add another goal or so to the list. In the meantime and in between time, let's just see how I do with what I am working with.
There are other things that I would love, such as having live plants and replacing the lighting fixtures, door knobs and switch plates. The plants will ultimately die with the lack of sunlight. And I need to really decide if I want to go through the trouble of replacing the door knobs, switch plates and lighting fixtures in a place that I will leave eventually. I know those things can be removed and I can take them with me when I move, but it's more about whether or not I want to make that much of an investment here. We shall see.
Anyhow, I am pretty excited about this because although I already had goals in mind for creating a loving atmosphere for my little family, I am now even more inspired and am in some really great company as I do so.

What type of home goals are you setting for 2012?

xoxo, tami


Monday, January 16, 2012

Living Room: Bombe Chest Update

You may recall in a previous post I shred my lifelong love of the bombe chest. Well, I am happy to say that I found the perfect bombe chest for my living room. I scoured Craigslist for weeks, seeing bombe chests running anywhere from $300-500 smackeroos. Well, persistence paid off and I am convinced that Craigslist is my friend because I snagged this little baby for $100 bucks. Thanks so much to my friend Melissa, who not only helped out with the use of her pick-up but also helped me carry into the apartment. And of course, a big thanks to Nicky who, in her preggo state couldn't help with the lifting of the chest, but did a great job keeping our spirits lifted with her funny stories. Love those ladies.

Without further adieu, here she is in all her glorious splendor ready to be the new media center for my living room. Isn't she a beauty? (excuse my horrible lighting and grainy iPhone photos, again). xoxo


Wednesday, December 21, 2011

Living Room: The Bombe Chest


I have had a nearly 20 year fascination with bombe chests.  I love the curvy feminine lines and the incredible details.

Well, when I moved into this spot, my entertainment center pretty much fell apart on me. Partly because I am probably the only person in this nation that doesn't own a flat screen TV! And because of that, the weight of the TV pretty much crushed the soul out of my TV stand, causing it to buckle in the middle, the legs to become all wobbly. It was like an old lady. Poor thing. I had to send it to the retirement home.

So my family and I settled into our new digs and our Jurassic TV went directly onto the floor. Everyday it looked at me begging me to find a lovely place for it to sit. I looked at it and thought to myself, "If you weren't such a great TV, I would trade you in for a sexier model, but I kinda like you."

Since placing my TV on a diet wasn't a possibility, I set out to find a new home for her. What I found was that the TV stands and entertainment centers sold today are mainly created for the new and sexy flat screens! AND unless I was willing to shell out over $1,000, I was bound to settle for a cheap particle board stand that would eventually buckle under the weight of my beloved.


I needed something made out of solid wood. I needed it to have a place to discreetly hide my DVDs and CDs and I wanted it to be a good looking piece of furniture that would go well with my City Girl Chic vibe but still be classic enough to stand the test of time. Enter the bombe chest. It has all the right elements and goes well with the subtle feminine vibe I am trying to convey. It is sensuous with it's curving lines without being overly girly or frilly.


Bombe chests were first introduced during the French Regency Period. Bombe is a French term for any rounded or convex piece of furniture. Sometimes spelled "bombay", but it is not refer to Bombay, India. During the reign of Louis XV, French cabinetmakers began to abandon the classic styling of furniture loved by King Louis XIV, who placed strict limitations on how furniture may be designed. Master craftsman were finally able to express themselves and furniture masterpieces began to emerge. Many of these pieces had curved or bowed shapes. It was often lacquered with chinnoiserie, or Chinese inspired designs, such as flowers, exotic birds, dragons and tigers never before seen on furniture.


How much do you love that this piece of furniture was born out of a need to express oneself creatively following a repressive state of being? This is right up my alley and perfect for My Renovated Life.

Today's bombe chests are a bit more diverse, and traditionally have Queen Anne style Legs (which is exactly what my table desk has), and ornamental hardware. Many people use them as an accent piece to their entryway, and perhaps I will too as my living quarters change. I do long for a place large enough to actually have an entryway or foyer. But for my small apartment, I was on the hunt for a dark walnut finish, no chinnoiserie and minimal ornamentation and hardware. The most fun part of this search is that it is nearly impossible to find two chests that are the same. Like the snowflakes of chests.


I am REALLY hoping to find the perfect piece. I want a classic piece that my family can treasure for years to come. And I need a new home for my television that will fit right in with this new design I am installing in my living room/workspace. Wish me luck.

What do you think of the bombe chest? If you have one, I'd love to know how you use it and how it's styled!

Tuesday, December 6, 2011

Workspace: Spray Painting My Desk


I have really grown to love Craigslist. It is a cornucopia of unwanted items. Every now and then you come across an unusual and perfect item. And that is exactly what happened when I found my table desk.


I needed a desk that could fit into the little workspace nook that I painted in my living room. And I wanted something that had enough surface for my laptop and a few desk accessories. I didn't care for drawers and it had to be made out of wood. I wanted something that could be painted white so it would really stand out and pop against the chocolate swirl paint that I added to my workspace.


So the hunt on Craigslist began. I had my eyes out for a table desk and that is when I found this beauty. It was only $25 and it was being sold very close to my home. If you have ever lived in or been to expansive LA, you will understand that proximity can make or break a good deal!


It was perfect. It had curvy legs in the Queen Anne style, some unique carvings on the legs and was being sold as an illusion table. It has the unique ability to look as it were coming out of the wall.


I brought this baby home, decided saw that it needed additional sanding before I could paint it white. So, what does a girl do? She heads out to visit her favorite DIY friend, Home Depot!


This was shaping up to be another inexpensive project. Between the actual desk and the supplies, this total came to $42.86. Not bad!


First things first, I needed to protect my area with a drop cloth. Then I sanded the surface to remove any polyurethane and to provide the paint something to grab once applied. Once I finished sanding, I used a tack cloth to remove any excess sand and sawdust. This is the best way to rid of any debris and provide your surface with a smooth finish for painting.


Then I needed to repair a split in the leg with wooden filler and allow it to set for at least 24 hours. Afterwards, I sanded it down to give it a smooth finish.


To ensure a successful painting job that resulted in a durable finish, the table desk was then covered with a layer of Rust-Oleum Primer. Now the table desk was ready for it's first coat of paint. I used a can of Rust-Oleum Ultra Cover spray paint. Be sure you are wearing a mask to protect you while you prime and paint your furniture.


I ended up putting four coats of paint before I was satisfied with the coverage. I love how the details stood out once I painted it white. And it looks really good in the space. As you can see below, there seems to be a little variation in shade on the top, but that simply the light bouncing off of the wood grain, creating shadows.

NOTE: In hindsight, I probably will not spray paint again. It was very messy and the toxins in the air were way too strong.


I am really starting to love this area so much! I can't wait to accessorize and add some lighting! Perhaps then my photos will come out a little better!


So...what do you think?


xoxo, tami

Tuesday, November 29, 2011

Workspace: Painting the Walls


Welcome back! Today we are going to paint my wonderful little workspace. I am beyond excited to get started. So, as you may recall this little area was a former closet. It is in my living room area but since we rarely use the television in our home, it should be a perfect place for me to turn my back to the activity of my home and focus on the work at hand. If this is your first visit and you want to know more about this process, feel free to review the posts on my Color Palette and Paint 101.


OK, are you ready? Let's get this party started!

Materials {found at Home Depot}:

Pour your paint into the paint tray.Only fill your tray about half full because the space on the top with the ridges is to squeeze the excess paint out of your rollers and brushes.

PREP TIME:
As I stated before, I am painting inside of a former closet. However, if I were painting a room, I would need to remove the plates from all light switches and electrical outlets. I would also need to remove any lighting fixtures.


1. DUSTING - You want to be sure the walls are free from dust particles and cobwebs. Anything remaining on your walls will inevitably be painted over, which may lead to unsightly bumps and creases in your paint job. Because I live in Southern California, we always have spiders. And with spiders come cobwebs, therefore, I purchased this duster to wipe away the cobwebs that seem to appear in the corners of my home all of the time.


2. TAPING - Next is taping. This can sometimes be the most tedious of jobs because you want to be sure your taping is straight and also well adhered to the wall and border you are protecting so that your paint doesn't leak through. I generally work with strips that are no longer than 12-inches in length because they are easier to line up properly. Be sure to cover all borders and tape the corners on the wall you will not be painting.

PAINTING THE WALLS:


First things first, place your drop cloth on the floor. Trust me, no matter how careful you are, it is very likely you will drop paint on the floor. It happens.


I very rarely paint the ceiling but if I were to do so, it would be the first task. Because I am using such a dark colored paint coupled with the fact that this area gets very little light, I chose to keep the ceiling the white color it currently is. When I place my lighting options in this area, I want the light to reflect back down to illuminate this space. {Trust me, honey, it needs all the help it can get}.

If you are painting the ceiling, you pretty much go about it the same way as painting the walls except you will need to purchase an extension pole to add to your paint roller and a two-step ladder for the borders. Unless you are Shaq, you will need the ladder and the extension pole. How else will you reach it?


3. BORDERS - You want to start out by painting the borders using either a brush or an edger. I prefer a brush because I am very particular about coverage and with a brush I can get in there and make sure it is completely colored in.


4. THE W - Using your paint roller, roll out a "W" shape about 3-4 feet wide. This is the basic movement you will continue to use as you paint your wall. When you have completely painted a 4-foot square, move onto the next area and repeat. Continue on in this manner until you have full coverage that bleeds into your painted borders. Because I am painting with a very dark and saturated flat paint, I didn't need more than one coat. However, if you are painting a light color over a darker color, or you are painting with a sheen, you will more than likely need two coats of paint. This will ensure more coverage, less streaking and a more durable professional looking paint job.

NOTE: Be careful not to overload your roller with too much paint. Not only will it drip and run all over the place, but it can also clump up if your paint is fast drying. If you get any runs or clumps, be sure to wipe it immediately with a wet rag. 

5. TAPE REMOVAL - Once your paint is nearly dry (not all the way dry), you can pull off the tape. Did your paint bleed over? No worries, you can simply touch up your trim or borders with a bit of paint in your walls original color.


VOILA!!!
You are done! Or in this case, I am done! It's dark, but I love it. Once I add the lighting to this space, it will be just perfect. It really does make a difference compared to the before photos, doesn't it? Hard to tell in my grainy iPhone pics with poor lighting, but it is a delicious chocolate-y color using a flat paint. Wait until you see what else I have planned for this area!

xoxo ~tami